Chocolate Cereal Bars

Last two weeks of 2015 has been great! I took time to rest, eat good food, and do stuff… felt very relaxed after a very long time! I didn’t do much cooking during this period but made a few desserts 🙂 Hope you too had a great time during Christmas and New Year with your family and friends 🙂

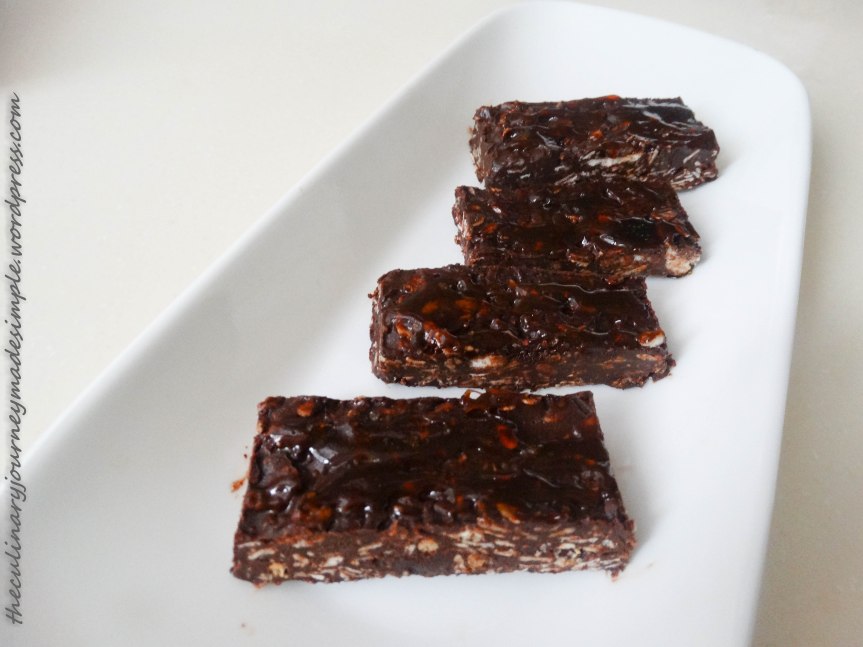
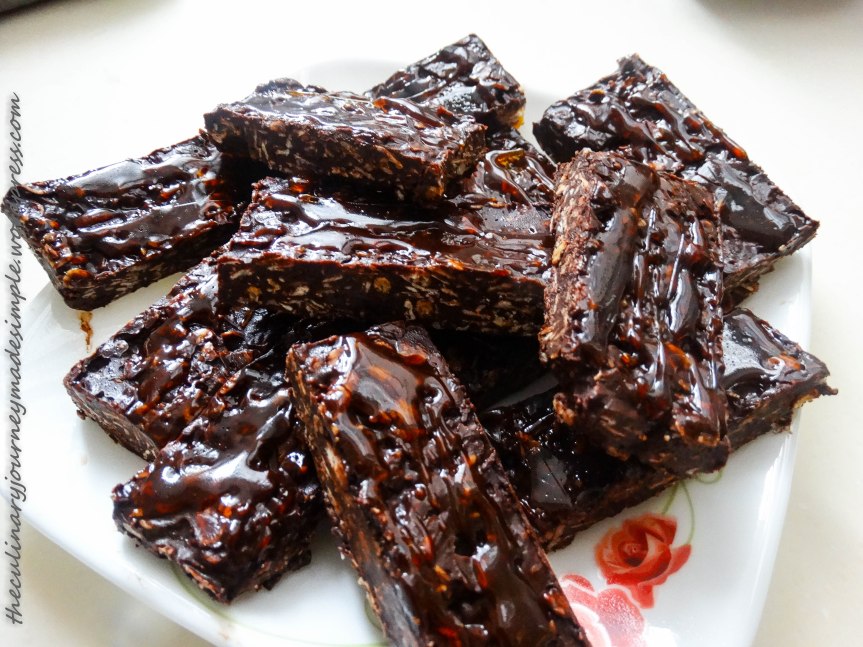
Today I made these chocolate cereal bars and while I prepared these I told myself “I must share these!” These are super easy to make and hardly takes any time, plus if you are looking for something sweet yet not a calorie bomb, this is the stuff you are looking for! The recipe is quite flexible so even if you don’t have the exact ingredients, it should be fine.

Go ahead and try these, you will love it! 🙂

DSC06142

Preparation Time: 30 minutes (excluding the time required for the bars to set)

Makes: 12 chocolate cereal bars

Ingredients:

Chocolate, dark couverture – 200 g

Chocolate Milk – 1/4 cup

Cereal – 100 g, I used unprocessed muesli for this recipe.

Orange flavor – 1 to 2 tsp

For the caramel:

Water – 2 to 3 tbsp

Sugar – 2 tbsp

Special Accessories:

Baking Paper

Small Tray

Cling Film (optional)

DSC06132DSC06133

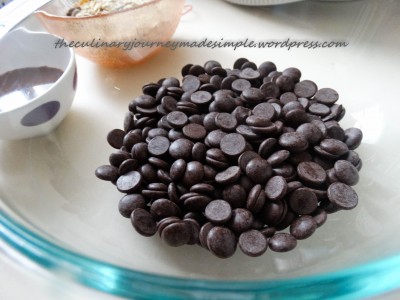
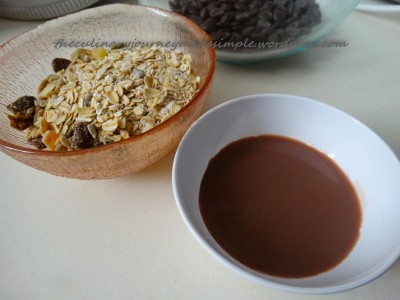
Step 1: Heat the chocolate in microwave in bursts of 30 seconds until it has fully melted. Add the milk and mix well.

DSC06135

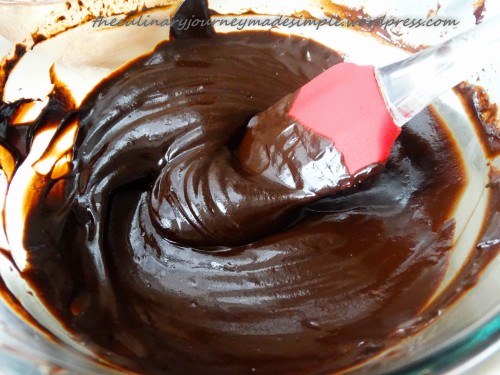
Step 2: Add the Cereal and orange flavor and mix well.

DSC06137

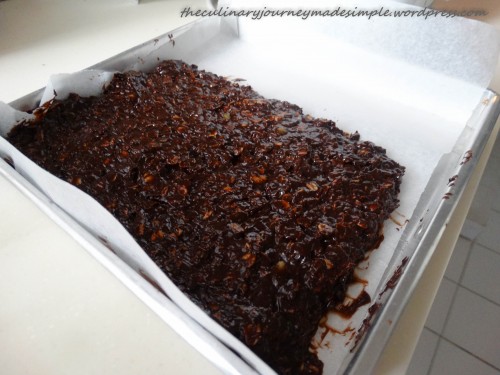
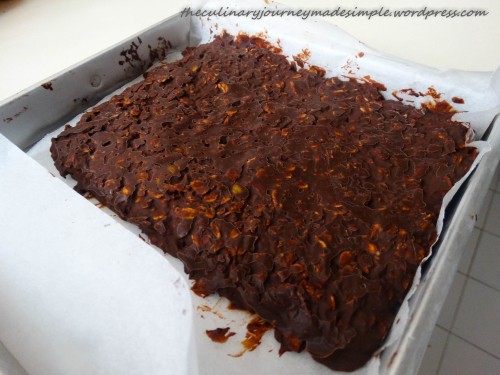
Step 3: Take a small tray and place the baking paper so that it covers the base and sides of the tray. Transfer the ingredients to the tray and spread it evenly. Cover the tray with the cling film (optional) and put it inside the fridge for some time until it sets.

DSC06138

Step 4: Once the chocolate has set, take it out and cut it into bars (you can cut it into shapes and sizes as per your preference). Place the bars into another plate or tray and keep aside.

DSC06139

Step 5: To make the caramel, take the water in a microwave friendly bowl. Add the sugar and mix well. Now heat it in the microwave in bursts of a minute and mix well until it gets thicker. Once the mixture has turned golden brown in color, take the bowl out and use a spoon to spread the caramel on the bars. Leave it to set and cool down for few minutes.

Step 6: Your delicious chocolate cereal bars are ready to eat! 🙂

A few tips: 

  • Create variation of these bars by using white chocolate.
  • You can add different flavors like vanilla, mint etc.
  • Add berries and nuts as you wish.

To print this recipe click here: Chocolate Cereal Bars

If you’ve enjoyed reading or cooking the above recipe, do subscribe to my blog by clicking the“Follow” button and “Like” my Facebook page at the top right hand corner for regular updates. Help spread the joy! 🙂

DSC06143

Chocolate Intoxication

As my chocolate making journey continues, I must say it’s just getting more and more exciting! After making truffles and moulded chocolates for the last couple of months, I decided to indulge into something different. So the other day when I was at the store, I saw these shot glasses and the first thought which came to my mind was not alcohol but chocolates!! I quickly mapped out a rough recipe in my brain 🙂

Totally energised, I tried the recipe after I got back home, but I realized I had forgotten the cream….so I made it only with chocolates and the result was a bit of a goof up since the chocolate hardened once I refrigerated it. So I tried it the second time with chocolate ganache and yes this time it turned out softer as desired. This recipe can be a very good dessert, as well as a mid day treat for you chocolate lovers out there! 🙂

You do not need to be a pro to prepare this recipe…it’s really simple and easy for first timers as well. So here you go….

108

110

Preparation Time: 35 to 40 minutes (excludes time required to set the chocolate)

Makes: 10 shot glasses of Chocolate Intoxication

Ingredients:

White Chocolate – 250 g

Dark Chocolate – 250 g

Cream – 1/3 cup each for the white and dark chocolate ganache

Dried cranberries – a handful, cut into small bits

Crunchy chocolate pearls – a few, as required

Mini marshmallows (optional) – a few, as required

Mini heart-shaped decorations – as required

Icing color (optional)

090091

Special Accessories:

Weighing scale or measurement cups

Shot glasses – 10, (you can also use normal small dessert glasses if you don’t have shot glasses)

Zip lock packets (optional) – 2, for piping the chocolate in the shot glasses

Step 1: With a spoon add small amounts of dried cranberries at the bottom of the shot glasses.

093

Step 2: Take the white chocolate in a big bowl. If you’re using a block of chocolate, make sure you chop the chocolate finely before measuring so that the chocolate melts evenly. Take the cream set aside for white chocolate ganache in another bowl and heat it in the microwave or on the stove until the cream just starts boiling and you can see small bubbles. Pour the hot cream on the white chocolate and stir until you get a smooth and thick mixture of the consistency you wish. Set at room temperature for few minutes, for the ganache to cool down. . You can a pinch of icing/food color if you wish to add some color to the white chocolate ganache.

097

Step 3: Take a zip lock bag and add the white chocolate inside it with a big spoon and then tie the top of the zip lock bag. Now press the chocolate towards one corner of the zip lock bag and cut at the tip (from where you want to pour the chocolate). Pour the white chocolate ganache equally into the shot glasses so that it has filled up a little more than half in each of them. If the ganache is still warm, let it cool down a bit and then refrigerate it for around 5 to 10 minutes.

098

Step 4: Meanwhile, prepare the dark chocolate ganache in a similar way as the white chocolate ganache (described above) and pour it into another zip lock bag. Take out the shot glasses from the refrigerator. Add some marshmallows to the glasses and then add the dark chocolate ganache in a similar way to cover up all the glasses. Leave it to set for 15 to 20 minutes and then add some crunchy choco pearls and mini heart decorations on top. You can use other decorations too as desired. Leave it to set for another 5 minutes and then refrigerate it.

101

Step 5: Enjoy the chocolate intoxication at any time of the day 🙂

A few tips:

  • Take out the shot glass from the refrigerator and keep it at room temperature for few minutes before serving.
  • Add some strawberries on top if desired. However, if you’re adding fresh fruits make sure you make in small quantities so that you don’t need to store it for a longer time. Alternatively, you can add the fruits on top just before serving.

To print this recipe click here: Chocolate Intoxication

If you’ve enjoyed reading or cooking the above recipe, do subscribe to my blog by clicking the“Follow” button and “Like” my Facebook page at the top right hand corner for regular updates. Help spread the joy! 🙂

107


Daily Chocolate Bites

Sundays are usually my time to relax but every Sunday doesn’t turn out to be as expected. It has been busy and tiring since morning! Hence, finally to relax myself, I tried out this recipe and yes I loved it!! Simply because it was so easy to make! No tempering of chocolate, no hours of sweating in the kitchen in this hot and humid weather! At first I wasn’t very sure if it would turn out as I was expecting, but yes it did!

I called it ‘Daily Chocolate Bites’ since you can prepare it every other day and you don’t even too many ingredients or accessories! I’m actually having my chocolate bite as I’m writing this post 🙂 The four layered ingredients tantalized my taste buds with so many flavours and textures – chewy, fruity, slightly crunchy and of course we have the chocolate flavour at the end! Chocolate simply makes everything so delicious! I cut the chocolate bites into roughly rectangular pieces which gave it a very nice home-made finish. Try it out and you will love it too 🙂

016

 Preparation Time: Around 20 minutes

Makes: 8 to 10 roughly rectangular pieces

Ingredients:

Dark Chocolate – Around 200 g

Marshmallows – 12 small discs (you can cut the big ones or even use mini marshmallows per your preference)

Dry fruits – Around 1/4 cup, cut into small pieces

Biscuits – 4, crushed into small irregular pieces (you can use the biscuit of your choice)

Margarine – 3 tsp

Golden syrup – 3 tsp

Special Accessories:

Baking paper

Weighing scale or measurement cups

Small sized box or baking tin

003001

Step 1: Add the golden syrup to the butter in a microwave safe bowl and heat it in the microwave for around 5 to 10 seconds. Mix well and let it cool for a few minutes. Add this to the crushed biscuits and mix well. Set aside.

004

Step 2: Take a small box or baking tin and place baking paper so that it covers the bottom of the tin and the sides. I used 2 small baking tins as I didn’t have a size that was just enough for the amount of ingredients I had. You can adjust the ingredients according to the size of your box or baking tin. Now place the crushed biscuits evenly as the base layer.

007

Step 3: Next add the marshmallows followed by the dry fruits. Now heat the chocolate in a microwave safe bowl in bursts of 10 seconds, with stirring. Once the chocolate has melted and has a medium runny consistency, pour it on top of the dry fruits so as to form the top layer. Use a spoon to even out the layer and then beat the box or baking tin a few times on the platform so that the chocolate has spread and settled evenly. Leave it as is for around 10 minutes and then refrigerate it until it has set hard.

009

011

005

012

Step 4: Once the chocolate has set, take it out and turn the box/tin upside down and you’ll have the block out. Carefully remove the baking paper. Take a sharp knife and cut it into roughly rectangular pieces or shapes of your choice. If it is too hard, leave it outside for around 10 minutes, else the pieces might break while cutting. Since the chocolate is not tempered, you will need to keep it refrigerated (especially if you’re living in a hot and humid climate).

Step 5: Enjoy your chocolate bites along your everyday tea or coffee 🙂

To print this recipe click here: Daily Chocolate Bites

If you’ve enjoyed reading or cooking the above recipe, do subscribe to my blog by clicking the“Follow” button and “Like” my Facebook page at the top right hand corner for regular updates. Help spread the joy! 🙂

015


Low calorie Chocolate Cake

Chocolate cake is one of my favorites among cakes, after Tiramisu. I also like simple marble cakes, black forest and the list goes on and on…. But I always find the cakes at bakeries to be too sweet and too heavy for my stomach! Although it is absolutely delicious….. yet it’s not something I would want to have every other day! I like to watch on my calories 😉

So, here’s the solution I came up with – a low-calorie chocolate cake. The recipe I’m posting today is actually my husband’s creation. He loves eating cakes and any kinds of sweet. So he came up with this recipe so that he feels less guilty about having a slice everyday and I have to say…… it’s my favorite!! It’s not very sweet or heavy on the stomach and I love having it after meals or with my evening tea. He has been baking this cake every now and then for almost a year now. So the other day I asked him to take a break and decided to give it a try. I followed the recipe religiously, but my hands were itching to do some sort of decoration. So I fulfilled it with some cream cheese, chocolate shavings and cherries!

If you love cakes and at the same time are conscious about your weight, this recipe is something which will make you happy for sure! You can omit the decoration part if you like it plain and simple 🙂

Pic 3

Preparation Time: 15 minutes

Baking Time: 15 minutes

Ingredients:

Plain flour – 100 g

Egg white of 2 eggs

Vegetable oil – 33 g

Castor sugar – 55 g

Low calorie chocolate milk – 100 ml

Cocoa powder – 3 tbsp

Margarine – 1 to 2 tsps

Dark chocolate chips – 2 tbsp (optional)

Baking powder – 2 tsp

Pic 6Pic 5

Step 1: Assemble all the ingredients first. Preheat oven at 180 degrees C for 10 minutes. Now sift the flour into a bowl. Sift the cocoa powder into the flour. Follow by adding the castor sugar.

Pic 7

Pic 8

Step 2: Add the egg white, vegetable oil, milk and margarine. Mix well until you have a thick runny consistency.

Pic 9

Step 3: Add the dark chocolate chips and mix well. The cake batter is now ready.

Step 4: Take a baking tray or bowl. Grease it with some oil. Pour the cake batter into the baking tray. Beat the tray a few times on the table so that it has set uniformly. Bake at around 180 degrees C for 10 minutes. Check it after 12 minutes or so.

To check if the cake is done, insert a fork or tooth pick or a cocktail stick in the middle. If it comes out clean, your cake is done. If not, bake for another 3 minutes and check again.

Pic 10

Step 5: Once the cake is ready, let it cool first at room temperature. After it has cooled, place a plate on top of the baking tray and turn it upside down to transfer it to the plate. You can choose to decorate the cake your own way. I decorated it with some cream cheese, chocolate shavings and cherries.

Pic 11

Step 6: Enjoy the low-calorie cake with your family and loved ones 🙂

To print this recipe click here: Low Calorie Chocolate Cake

If you’ve enjoyed reading or cooking the above recipe, do subscribe to my blog by clicking the“Follow” button and “Like” my Facebook page at the top right hand corner for regular updates. Help spread the joy! 🙂

Pic 4


Enhanced by Zemanta

Marshmallow Treats

Weekends are usually my time for making chocolates or rather using chocolates to make delectable sweets. I prefer making in one big batch so that it lasts for a few days. But no matter how much I make, it always gets over too soon!! I wonder why! 😀

I had got a big packet of marshmallows some time back and it had been lying in my baking shelf for the past couple of days. Marshmallows are always a nice treat, especially during weekends. And that Sunday the weather was awesome too… it was raining and it seemed just the right time for a treat! Dark chocolate is my personal favorite and so I decided to make a simple marshmallow treat coated with dark chocolate. I made some simple decoration too with the tempered chocolate on top of the marshmallow and yes… it was just the way I wanted it!

The soft chewy marshmallow melted in my mouth within seconds along with the dark chocolate, and I simply fell in love with it!! I said out loud to myself…. “A perfect Sunday!” I took a few for my friend’s birthday (which was on the same day) and they loved it too 🙂

Do you have any special sweet treat that you make for your family? Do share the recipes. I would love to try them out 🙂

Pic 7

Preparation Time: 1 hour

Makes: Around 50 treats

Ingredients:

Marshmallows – Around 16, big size, cut into small discs

Dark chocolate couverture – 250 g, finely chopped. This is to help the chocolate melt evenly and it will have lower risk of scorching.

Pic 1Pic 2

Special Accessories:

Weighing Scale

Thermometer

Baking Paper (optional)

Zip lock bag – medium size

Heating pad

Fork

Step 1: The marshmallows I had were quite big in size. So I cut each of them into 3 almost equal size discs as in the picture below. You can choose marshmallows of the size and shape you prefer.

Pic 1

Also place baking paper on 2 large trays and set aside (for placing the marshmallows dipped in chocolate).

Step 2: Tempering of chocolate – 

For tempering dark chocolate, take around 2/3 rd of the chocolate in a dry microwave friendly bowl. Heat the chocolate in the microwave for around 45 seconds. Take it out and stir it well with a wooden spoon (preferable) or spatula. Check the temperature. Heat again in the microwave in bursts of 10 seconds, stirring and checking the temperature each time until it has reached 46 degrees C (melting temperature of dark chocolate). You must do this very slowly. If the temperature has reached 450 C and not increasing further, run it in the microwave for another 4 to 5 seconds and check the temperature again so that it is 46 degrees C.

Pic 8

Once the temperature is at 46 degrees C, add rest of the chocolate to the bowl and stir until all the chocolate has melted. Keep checking the temperature intermittently until it has reached 29 degrees C (don’t worry if the temperature is 29 point something, it’s fine). Once the temperature is at 29 degrees C, heat it again in the microwave in bursts of 10 seconds, until it has reached 32 degrees C. This is the working temperature of dark chocolate (you must be very careful when you do this as even a few degrees here and there can make your chocolate go out of temper. Heat for 5 instead of 10 seconds if necessary and check again). Your chocolate is in temper now.

Step 3: Now you need to act quickly while your chocolate is still in temper. Dip each of the marshmallows in the tempered dark chocolate. Lift the dipped marshmallow with a fork (ensure it is covered with chocolate evenly on all sides). Tap a few times on the side of the bowl before placing on the baking paper to remove excess chocolate. Place it very carefully on the baking paper with the help of another fork or spoon. Repeat this until all the marshmallows are done. Ensure there is one some between each of the marshmallows when you place them on the baking paper.

Pic 3

Pic 4

Keeping chocolate in temper is a bit tricky. So while you’re doing the above, check the temperature of your chocolate from time to time. If the temperature has dropped a degree or so below 320 C, place the bowl on a heating pad to maintain the temperature (make sure the heating pad is not too hot) and stir it. Once it has reached the working temperature, you can use it again. This method has worked for me till date. But you could adopt other methods too as per your preference.

Step 4: Pour the rest of the tempered chocolate in a zip lock bag and cut a small hole at the end of the cone. Pipe in the chocolate over the marshmallows in a zigzag fashion or any other way you like. Let the treats sit at room temperature. If your chocolate has tempered properly, it will set within few minutes with a glossy finish.

Pic 5

Pic 6

Enjoy your homemade marshmallow treats with your loved ones 🙂

If you’ve enjoyed reading or cooking the above recipe, do subscribe to my blog by clicking the“Follow” button and “Like” my Facebook page at the top right hand corner for regular updates. Help spread the joy! 🙂

Pic 8


Enhanced by Zemanta

Double Chocolate Oreo – a Valentine treat

It’s already time for Valentine’s day and I really haven’t planned anything much! Well, to be honest, for the past few years we haven’t celebrated Valentine’s day in a grand way. It’s a day to celebrate love, so we did it in our own sweet way every year – we went for dinner at a cozy restaurant followed by a good movie.

This year too will be the same plan but I wanted to add in one of the top home made chocolates to the menu. I started making this last year after I learnt making chocolates and this one turned out to be my husband’s favorite till date. I’ve made it several times since then and loved making it each time  🙂

If you like Oreos and chocolates, you must definitely try this 🙂

How are you planning to surprise your valentine this year? Any new recipes or valentine ideas are appreciated 🙂

Happy Valentine’s Day!

Pic 11

Pic 12

Preparation Time: Around 1 hour

Makes: 23 Double Chocolate Oreos

Ingredients:

Dark chocolate couverture – chocolate coins, 250 g. If you’re using a solid block of chocolate instead of coins, chop the chocolate evenly into small pieces to make up to 250 g. This is to help the chocolate melt evenly and it will have lower risk of scorching.

Mini Chocolate Oreos – 23

Almond shaves – as required

Mixed fruit Jam – as required (feel free to use the jam of your choice)

Mix of peanut butter and grape jelly – as required (you can use other jellies if you’re allergic to peanut butter)

Pic 1Pic 2Pic 3Pic 4

Special Accessories:

Weighing Scale

Thermometer

Baking Paper (optional)

Mini cup cake baking tray

Chocolate cups

Heating pad

Step 1: Take a butter knife and apply small amounts of the mixed fruit jam to the top of each Oreo. Do not apply too much. Spread it smoothly so that that top is more or less even. Do this for half of the Oreos. For the rest of the oreos, follow the same with the mix of peanut butter and grape jelly. Keep each of them on a tray covered with baking paper.

Pic 5

Step 2: Take the mini cup cake baking tray and place the chocolate cups in each of the mould. If you don’t have such a baking tray, you can also use ice tray with a similar mould as a chocolate cup.

If your tray is small and cannot accommodate 23 oreos, you can adjust the amount of dark chocolate couverture according to the number of oreos used.

Step 3: Tempering of chocolate

For tempering dark chocolate, take around 2/3 rd of the chocolate in a dry microwave friendly bowl. Heat the chocolate in the microwave for around 45 seconds. Take it out and stir it well with a wooden spoon (preferable) or spatula. Check the temperature. Heat again in the microwave in bursts of 10 seconds, stirring and checking the temperature each time until it has reached 460 C (melting temperature of dark chocolate). You must do this very slowly. If the temperature has reached 450 C and not increasing further, run it in the microwave for another 4 to 5 seconds and check the temperature again so that it is 460 C. 

Pic 6

Once the temperature is at 46C, add rest of the chocolate to the bowl and stir until all the chocolate has melted. Keep checking the temperature intermittently until it has reached 290 C (don’t worry if the temperature is 29 point something, it’s fine). Once the temperature is at 290 C, heat it again in the microwave in bursts of 10 seconds, until it has reached 320 C. This is the working temperature of dark chocolate (you must be very careful when you do this as even a few degrees here and there can make your chocolate go out of temper. Heat for 5 instead of 10 seconds if necessary and check again). Your chocolate is in temper now.

Pic 7

Step 4: Now you need to act quickly while your chocolate is still in temper. Take a spoon and add small amounts of the tempered chocolate to the chocolate cups. Beat the tray a few times on the table so that the chocolate sits evenly in each of the cups. Follow by quickly adding all the chocolate oreos with the jam in the chocolate cups.

Pic 8

Pic 9

Step 5: Add more tempered chocolate to the oreos now to cover them up completely.

Pic 10

Keeping chocolate in temper is a bit tricky. So while you’re doing the above, check the temperature of your chocolate from time to time. If the temperature has dropped a degree or so below 320 C, place the bowl on a heating pad to maintain the temperature (make sure the heating pad is not too hot) and stir it. Once it has reached the working temperature, you can use it again. This method has worked for me till date. But you could adopt other methods too as per your preference.

Step 6: Once you’ve covered all the oreos with chocolate, add almond shaves on the top for some decoration and leave it at room temperature. If your chocolate has tempered properly, it will set within few minutes with a glossy finish.

Enjoy the double chocolate oreos with your special one 🙂

If you’ve enjoyed reading or cooking the above recipe, do subscribe to my blog by clicking the“Follow” button and “Like” my Facebook page at the top right hand corner for regular updates. Help spread the joy! 🙂

Pic 13

Related articles

Enhanced by Zemanta

Chocolate Squares with Marshmallows

So finally here’s the post I’ve been meaning to write since a long time. Chocolates!! I was always intrigued by the chocolates at the stores and wondered quite often how they make them look so inviting? Buying assorted chocolates seemed not only expensive but sometimes I couldn’t find the exact flavor I wanted! So I finally decided to try them at home instead of running to the store every time! And this journey started around six to eight months ago. After trying a few recipes at home, I attended a half day workshop here in Singapore held by Swiss chef Reto Marzari and since then I’ve enjoyed every bit of the experience starting from melting the chocolate, tempering and mixing other ingredients with it giving it the flavor and taste I’m craving for!

For my first post on chocolates, I thought of starting with a very simple one – which doesn’t need tempering and without too many steps to follow. Marshmallows with chocolates have always been a personal favorite and one of the easy ones to start with! The delectable chewy taste of the marshmallows in the chocolate ganache just melts in my mouth making it a sheer weakness! I like the roughish look on the chocolate too as it gives a very homemade feeling 🙂

The journey of making chocolates has just started and I have a long way to go! I feel excited at the thought of how incredibly beautiful each and every step of the journey will be and this is one journey I would want never to end! Woaahhh! That was a bit poetic right? Well, that’s how I feel when I’m making chocolates 🙂

Hope you enjoy making this as much as I did and share chocolate happiness with your family and friends 🙂

Pic 24

Preparation Time: 45 minutes (excluding time to set the ganache)

Makes: Around 25 small squares

Ingredients:

Dark Chocolate couverture – 260 g

(Using a good quality chocolate is very essential for making a good quality square or truffle. You don’t need to spend too much, but make sure you buy a decent one. I like using couverture for many of my chocolate recipes, especially for the tempering. You can buy chocolate from a store which sells baking products or if you don’t have one near your place, it’s also available in Supermarkets here in Singapore).

Whipped cream – 1/2 cup

Mini marshmallows – 15 g

Cocoa powder – As required, to cover the chocolate squares

Pic 2Pic 4

Special Accessories:

Weighing Scale

Baking Paper

Plastic wrap

Step 1: To make the chocolate ganache, pour the cream in a medium sized clean dry bowl and heat it in the microwave for few minutes until it just starts boiling (you’ll notice small bubbles). Take it out of the microwave. Add the chocolate to it and stir until smooth. If you notice the chocolate hasn’t melted properly, do not worry. Heat it for another 30 seconds or 1 minute in the microwave and stir again. At the end you should have a smooth glossy mixture of the chocolate and the cream. Your ganache is ready now.

Pic 6

Pic 8

Step 2: Let the ganache cool down slightly. Follow by adding the marshmallows to it and stir so that all the marshmallows are covered by chocolate.

Pic 10

Pic 12

Step 3: Take an air tight box and baking paper. Cut the baking paper a little bigger than the size of your box. Place the baking paper neatly inside the box so that all the four walls of the box are covered and you still have a part of the baking paper outside the box (this will help you pull it out after it the mixture has set in). Pour the mixture in the box. Beat the box on the kitchen table a few times so that the mixture has spread evenly inside the box. Place a piece of plastic wrap on the top and close the box. Keep it in the fridge for 15 to 20 minutes or until a bit firm.

Pic 21

Step 4: Open the box and remove the plastic wrap. Lift out the mixture from the box. Take a sharp knife and cut it evenly into small squares. Make sure the mixture isn’t too hard when you cut it, else it might break. In such a scenario, leave it at room temperature for another 10 minutes or until a little soft [Make sure the mixture isn’t too soft, it might be difficult to lift up the chocolate squares and mix with the cocoa powder].

Step 5: Take a clean dry bowl. Sieve a few tablespoons of cocoa powder into the bowl. Lightly lift each chocolate square by using a fork and drop it in the cocoa powder [ensure you lift the chocolate square by placing the fork lightly at the bottom of the square only]. Turn every side of the chocolate square so that all sides are evenly covered with the cocoa powder. Transfer and place it on a tray covered with baking paper . Sieve in additional amount of cocoa powder as required if you run out. Follow the same until you’re done with all the squares. Place the squares in an air tight box. Wrap it with plastic wrap and store them in the refrigerator for at least a week.

Pic 15

You can freeze them as well at least for 1 to 2 months, but I’m sure you wouldn’t have to store them for that long 🙂

Enjoy your homemade chocolate squares every now and then 🙂

If you’ve enjoyed reading or cooking the above recipe, do subscribe to my blog by clicking the“Follow” button and “Like” my Facebook page at the top right hand corner for regular updates. Help spread the joy! 🙂

Pic 26

Enhanced by Zemanta